
So, first things first. First, this happened:

I was just spinning along, when I suddenly stopped because the right footman connector spontaneously broke in two places. You can see that it is not connected above or below the part that rocks back and forth. I don't know what it's called. If I had a manual or a diagram, I would know. But I don't.
Next, I ordered the replacement parts and one tool. I purchased the pieces pre-cut, but I did find other places that offered one long piece that you can cut yourself. I also ordered the square screwdriver I needed for the Lendrum screws. Rumor has it that earlier wheels had Philips head screws, so take a look at your wheel before you buy the screwdriver.
 |
| Screwdriver and replacement pieces |
 |
| Screw in the right treadle |
 |
| Screw in the back of the rocker-thingie |
First step of the actual repair: I took out all of the screws, keeping track of where they go back. Once the screws were removed the footman connectors were a little tight in spots, but they pulled right out. Even though the left one didn't break, I replaced it anyway. Seemed like a good idea.
 |
| Old connectors vs. new connectors. If your connectors look like the set on the left, you should buy a new set so you have it when one breaks. They do age. |
Second step: I re-installed the left connector, pushing it in as far as it would go into the rocker-thingie above, and flush with the bottom of the treadle below. Re-installing the treadle screw was pretty straight-forward, but I really had to push on the screw in the rocker-thingie. The screw goes straight into the connector, with no threaded guide, so you have to push a bit while twisting to get it to go in.
 |
| Can you see this? The connector is Right. There. and you gotta make the screw go through it. PUSH! CAREFULLY! |
Now, I had to guess on how to install the right connector. It connects with screws at the treadle, the rocker-thingie, and the footman. The question becomes where to secure the rocker-thingie. What I did was to line up the left and right treadles and adjust the rocker-thingie to be parallel to the floor, and secured it there with the screw.
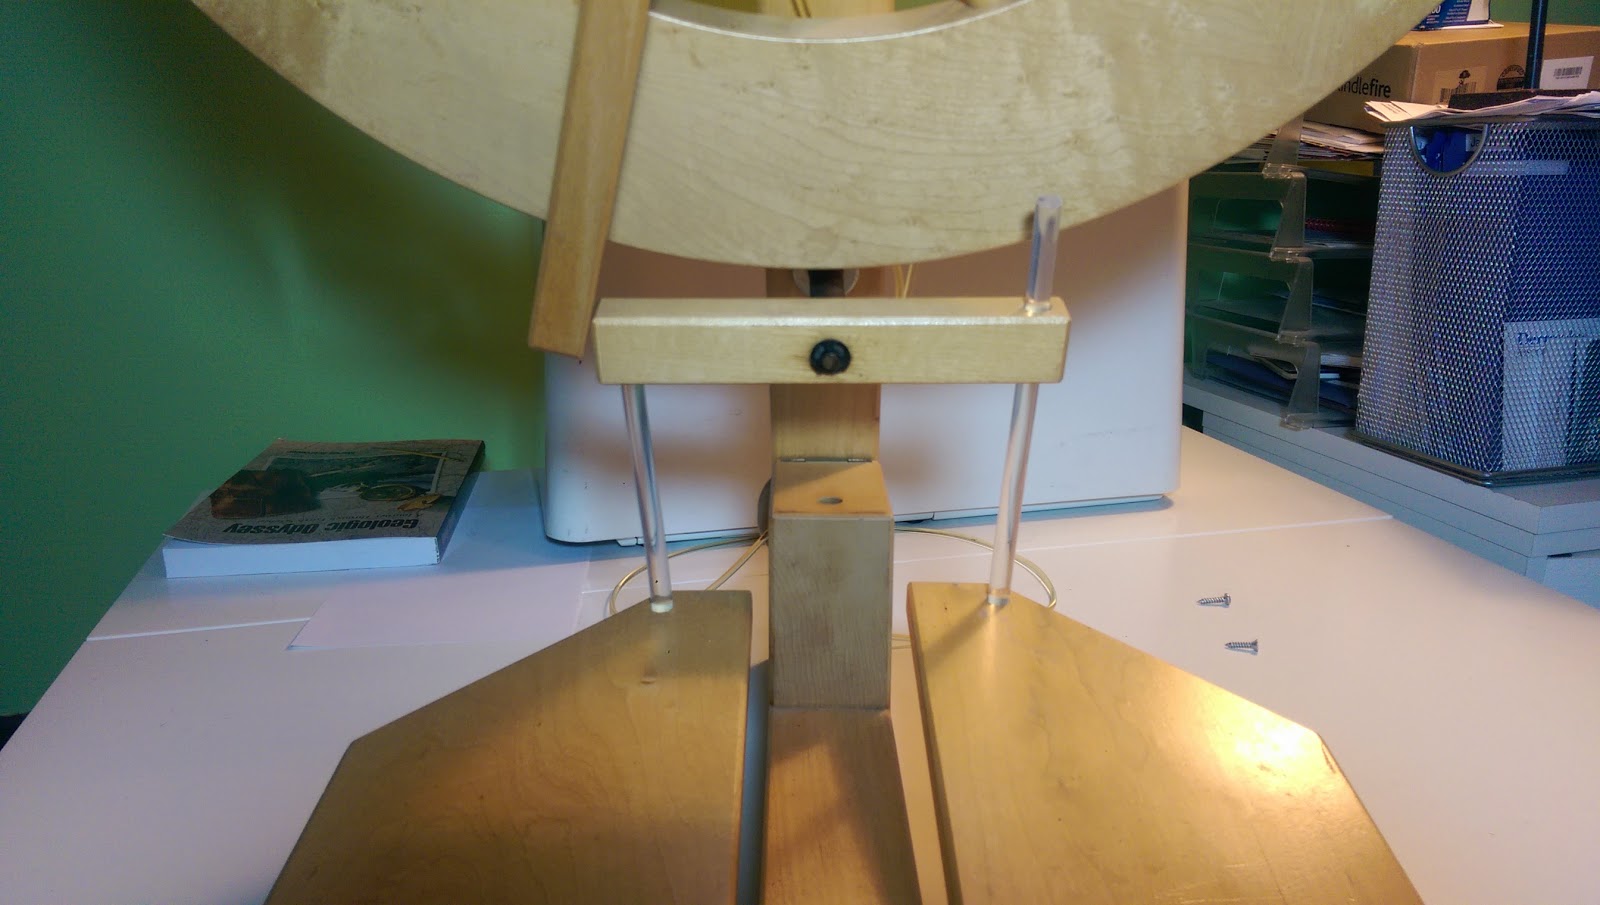 |
| Shadow makes it look a little off, but I think it is straight. |
Last step! (One reminder: if you moved the drive band out of the way, or if it moved itself, be sure it's back where it needs to be before you secure the last screw, or else you'll have to remove the c clamp to put it back on.) At first I pushed the connector all the way into the footman, but then the footman was too close to the rocker-thingie to move as far as it needed, so I backed it out a bit and looked at a few other wheels on the internet to see how they looked. This looked about right, so I installed the last screw, and gave it a little whirl.
 |
| Ta Da! |
I hope this is helpful to someone. If you have a schematic or diagram of the Lendrum Original, please share. At least tell me what the rocker-thingie is and I'll edit the post with the correct terminology.
25 comments:
Just wanted to say THANK YOU for this. I just got a used lendrum from a friend and it is in great condition except for these pieces (they are old and yellow from age and disuse), and now I know exactly what to do! You are a lifesaver!
I just printed this out for my DH to replace the connectors that broke last night when I took my wheel out of its carry case to demonstrate spinning at our county fair. Thank you very much for having this available. You are a goddess!
This was extremely helpful - thanks for posting it! I just received the new connectors from the Woolery, and was dismayed to see that they don't have pre-drilled holes. I bought the drill bit that works with these screws (cheaper than buying the whole screwdriver), and was able to install them quickly with the help of your guidance. Thanks!
I think buying the connectors pre-cut is the best way. Considering how kinked my old ones were, I would never be sure I had the right length.
Thank you for posting your tutorial on replacing the footman connectors on the DT Lendrum. The most difficult part of the procedure was finding a screwdriver with a #1 square tip. Heaven knows why Lendrum changed from Phillips to square head screws. Anyhow, it's done and I can spin again!!!
Thank you for posting this tutorial! The pictures were very helpful, as was the reminder to check the drive band location before screwing the last bit. I HATE to change the c-clamp....
My "long" connector on my DT broke doing a demo. Luckily, we had 3 other spinners that day!
Thank you so much for posting this wonderful tutorial about replacing the connectors on the Lendrum DT! Mine broke last fall and I purchased the plastic connectors and purchased the screwdriver as you recommended, and have been trying to work up the courage to try to fix it since then! Today was the day and I set out with tools and your post. All went perfectly and my wheel is all fixed and ready to go. Thanks again for this tremendous teaching post!!!
Thank you for this post. My granddaughters discovered the connectors were broken. I was delighted to find parts available from Woolery, but was now looking for instructions to replace them. I'm surprised Lendrum doesn’t have more information available online, like a maintenance manual wth instructions. Now I guess I need to look at what sort of screws the wheel has. I expect to be back in business in no time, thanks to your tutorial.h
Absolutely invaluable, thankyou so much.
really valuable tutorial, even a senior like me can understand and picture how to change these pesky tubes
Thanks for this very clear tutorial. I just took out my Lendrum, which had been sitting in a corner of our living room for several years aging while my kids were babies. I'd noticed the drive bands were yellow with age, and wasn't too surprised when one did indeed snap when I started to show my now 4-yr-old son how the wheel works. He was still happily peddling along nice and slowly when the footman connector snapped too. That I worried I'd have to send the wheel off for. It's nice to know this is something I can repair myself.
I am glad your post was still available. My connector broke on my 17 year old Lendrum. I ordered new connectors, and I think I could have figured it out for myself. But your post gave me confidence to do the repair myself and it was pretty simple. I did add a step of drilling holes through the connectors where the screw holes would be. It was a little tricky but doable with the connector secured in a vise. BTW, my wheel has the square holed screws. I must have had paperwork when I bought it, but could not find anything now. I would not have thrown it out, so if a schematic will turns up I’ll post it.
The square holed screws are called Robertson. It's a Canadian thing. :)
My connectors have just broken, so I appreciate finding this post. I also want to note having just taken out the 5 screws attaching the connectors, my wheel has 2 different sized Robertson ("square" for the non-Canadians) screws (3 smaller on the footman and "teeter-totter" and 2 one size up on the treadles). I second getting a decent, preferably ratcheting and magnetic, multi head screwdriver, its only a few bucks more expensive than a single screwdriver, and personally I've used them regularly on wheels and looms over the years, it's worth the $15 investment.
Thank you for the tutorial. Wheel is now fixed!
Perfect instructions. Thank you very much!
Thank you for posting this! My 20+ year old Lendrum's plastic (?) connectors have broken this summer in many places. I didn't know I could fix it myself!
Your step by step instructions and photos were spot on. I couldn’t have done it without you. Thanks for sharing your expertise.
Your step by step instructions and photos were spot on. I couldn’t have done it without you. Thanks for sharing your expertise.
Another grateful reader. My issue was that the connectors had broken in several places, including right level with the footman, and the texture was like very old Christmas candy. I finally dug the pieces out by screwing in a Phillips screwdriver to pull out the shards, and also levering a metal yarn needle into the screw hole to push.
I fastened the right connector at top (the footman) and bottom (the treadle), and then turned the wheel. Noticing that it worked fine except that the rocker thingie (which I think must be the pivot arm because nothing else seems to be) works its way up to the footman so that the two wooden pieces rub together, I pulled the pivot arm away from the footman and shot the screw in there. Great advice to position the drive band before connecting the right side. Thanks so much!
Another grateful reader! Thank you for your clear instructions and photos. It's amazing that there does not seem to be any instruction on the web for this common repair, but yours gave me the confidence to do it. The replacement connectors and the special screwdriver came from the Woolery within 5 days of my order, so kudos to them,but your instructions were essential, thank you!
Thank you so much for creating this page. I’m sure this took a bit to put together but I’m so thankful you did!
October 2023! The Lendrum DT I bought new in 2003 just broke its left treadle band (for the first time, so that's lucky), so today I am treadling with just the right treadle (which luckily connects to the pivot arm!) To finish up the current couple of rolags so I don't forget my plan halfway through. It looks like both Woolery and Paradise Fibers carry replacement bands, so I will order from one of them as I have had good experiences with both companies throughout my spinning decades. Thank you for the helpful suggestions re drive band and screw heads and assembly techniques! And I will go ahead and order a new drive band while I'm at it - it's probably made of the same material and is just as old, so I might as well replace it before it breaks!
Thank you so much for this post. My lendrum sat for more than a year and the connectors broke. After a lot of searching I found your post and it was a life saver
I was able to remove the very old brittle crumbly connectors except for the one that goes up into the actual footman; it broke off and a part of the connector is still stuck up in there. I have been able to reach in and break off bits of it, but still have a long way to go. Any suggestions would be appreciated.
800p July 31, 2025
Oh no! I don't have any experience with this problem, but someone a few comments back mentioned the use of a metal yarn needle and levering. I would imagine anything pointy and sturdy would do the trick. Maybe The Woolery or Paradise Fibers would.ahve advice as well. Good luck!
Post a Comment